Ce manuel existe aussi en français
Nederlands Français English Deutsch Polski Română
Trikker 2.0 Trikker 2.0-beta
Trikker manual
Drawing software for electricians: from wire schema to an inspection-ready dossier.
1. Welcome
What Trikker does, how a dossier fits together, and where to start.
1.1 What Trikker does
Trikker draws the  Wire Schema and the
  Floor plan of an electrical installation, and bundles them together with the list of circuits and the
  Bill of materials into a single inspection-ready dossier.
What sets it apart from an ordinary drawing program: on the Wire Schema you never draw a line or drag a symbol into place. You pick a symbol and click the connection point where it belongs. Trikker then works out the entire layout, draws the connections and gives every circuit its letter. It redoes that on every change, so the schema always stays correct.
1.2 The workflow in five steps
- Start with the Wire Schema. Pick symbols from the library and click an insert point.
- Draw the floor plan on the Floor plan, or import an existing building plan from AutoCAD or PDF as an underlay.
- Place the symbols you used on the schema onto the plan with a single click. They stay linked to their counterpart.
- Fill in the dossier details on the
 Document tab: customer, site of the installation, electrician and inspection body.
 - Print the dossier from the
 Print tab, or turn it into a PDF.
You can also work the other way round. Switch on Allow loose symbols to be added on the floor plan in the settings, place symbols on the plan first, and add them to the Wire Schema afterwards.
1.3 What you need
- A Windows or macOS computer. Any device that runs Windows runs Trikker, and from version 2.0 Trikker also runs on macOS. There are no separate hardware requirements.
- An internet connection, now and then. Drawing, saving and exporting work offline; checking the licence and creating the PDF need a connection. See Internet and working offline.
- A licence code, for the full version. Without a code Trikker runs as a demo version.
2. Installing and starting
2.1 Downloading and installing Trikker
The installer fetches the latest version and doubles as an update: you do not need to remove an older version first.
- Close your other programs. The installation may want to restart your computer.
- Go to www.trikker.be/en/web-version-windows. The download starts right away.
- Open the downloaded file. If a Windows security warning appears, choose Yes or Run.
- Wait for the installation to finish, then start Trikker.
Download stalling, or blocked by your company network? Use the offline installer instead: a single file that brings everything with it, without pulling components off the internet during installation.
2.2 Deploying Trikker on multiple computers
Installing Trikker for a whole team, or through an MDM/deployment tool such as Microsoft Intune? That uses the same installer, combined with a silent install and a license per device. The full explanation, including the steps specific to Intune, is on Deploying Trikker on multiple devices.
2.3 The first start
On the first start, Trikker asks for your language and your name in a small window: Select a language and user, and click on the OK button. As long as the User: field is empty, OK stays blocked with the message Your name cannot be empty.
At that first start the language is already filled in from your operating system. You can change it at any time; see The language of the program.
2.4 Terms of use and data processing
The Gebruiksvoorwaarden en gegevensverwerking window appears once. Scroll to the end of the text (Blader tot het einde van de tekst om je keuze te kunnen bewaren.) and make two choices:
- Ik geef Trikker toestemming om mijn dossier naar zijn servers te verzenden om de PDF aan te maken. Zonder deze toestemming kan er niet afgedrukt worden. This is the important one. Trikker creates the PDF of your dossier on its own servers, so printing means the dossier is sent. Without that permission, printing is not possible.
- Trikker mag een verzonden dossier geanonimiseerd bijhouden om nieuwe functies te ontwikkelen. (optioneel) This choice blocks nothing. It lets us keep a sent dossier in anonymised form to develop new features.
Save your choice with Bewaren. You can change it at any time; see Privacy. If you try to print without permission, Trikker reports Afdrukken niet mogelijk.
2.5 Updates
On starting and on closing, Trikker asks the server whether a newer version exists. If so, the Update available window opens with the question A new version of Trikker is available. Would you like to download and install it? and the buttons Now and Later.
For a mandatory update there is no choice: the message reads A mandatory update is available. Press OK to install. with only OK.
The check only runs when exactly one Trikker window is open. Not seeing an update message even though a newer version exists? Close all windows and start Trikker again.
2.6 End of support for a version
Every version of Trikker is supported for a period. As the end of that period approaches, the program warns you in advance; once it has passed, Trikker reports This version of Trikker is no longer supported. Please install the latest Trikker version.
Then install the latest version through www.trikker.be/en/web-version-windows. Your licence and your dossiers stay untouched.
3. Licence and activation
Without a licence Trikker runs as a demo version. A licence code unlocks the full version.
3.1 What the demo version can do
There is only one Trikker installer. Whether the program behaves as the full version or as a demo is decided by the licence at startup. The demo lets you try everything, but it is deliberately too limited for real dossiers:
- at most 5 circuits on the Wire Schema. Once that limit is reached the insert points disappear and Trikker reports Demo version You can only draw 5 circuits. Delete a circuit to continue
- one page on the Floor plan
- the watermark Trikker - Not yet activated - across every print and every export
3.2 Activating with a licence code
The licence screen is on the  Extra tab.
- Open Extra. Without a licence it reads This is a demo version of Trikker
- Type or paste your code into the License code: field.
- Click Activate Trikker. During the check the screen shows Just a second, your license is being checked...
- On success the screen reports Trikker is activated and ready to go! and shows the licence holder's details at The license has been attributed to:
Those details now also appear as the electrician on your prints. To change them, use Change my details.
No code yet? The screen helps you along with To the webshop and, for licences you already bought, Manage my licenses. To move this computer onto a different licence, use Activate with another license code.
The Computer ID: field shows this computer's unique code, in five groups of five characters. A small button next to it copies the code to your clipboard. Handy when the helpdesk asks for it.
3.3 Reading the licence badge
The main window shows a badge with the licence status. Clicking it opens the licence screen.
| Badge | What it means | What you do |
|---|---|---|
| Checking | The check with the licence server is running. | Wait a moment. |
| License OK | All in order, full version. | Nothing. |
| License about to expire | The licence has not been renewed for a while. You are still working in the full version. | Connect your computer to the internet. |
| Connection needed | Offline for too long: Trikker is a demo version again. | Connect and click Connect with license server. |
| License expired | The subscription itself has lapsed. | Renew your licence through Manage my licenses. |
| License invalid | The licence server is holding the licence back, or it belongs to another computer. | Activate again on this computer, or get in touch. |
| Activate Trikker | Never activated. | Fill in your licence code. |
If something is wrong at startup, Trikker opens the Extra tab itself, with the heading Trikker has been deactivated and has been switched back to demo mode and a line giving the reason. A plain demo version that was never activated does not push itself forward.
3.4 Working on while offline
Trikker does not need to be online all the time. The last confirmed licence is kept locally and stays usable until its expiry date. How long that is, the licence server decides for each licence.
If that date approaches without the server being reachable, the screen says: Your license could not be verified with the license server for a while. Connect your computer to the internet to avoid switch back to demo mode. Stay offline longer than that and Trikker falls back to the demo version. If the connection fails, you see A connection with the license server could not be established, with Connect with license server to try again.
When judging the expiry date, Trikker asks public internet time servers and takes the most recent date. Putting your computer clock back therefore does not reactivate an expired licence.
3.5 Converting an old licence file
Older licences came as an activation file with the extension .triklic. Such a file no longer activates Trikker directly.
When you open it (double-click, or through  Open with the old licence file filter), Trikker sends its contents to the licence server, which converts the old licence into an online licence for this computer. On success Trikker reports Trikker has been activated So an internet connection is needed. If the file is refused, Trikker - Invalide license file appears, with the server's reason underneath.
3.6 The educational version
Schools work with an educational licence. It unlocks all drawing features, with no circuit or page limit, but it makes the prints recognisable as teaching material:
- at the top of every page the watermark Trikker - Only to be used for educational purposes
- in the title block, instead of the customer's details: Made with Trikker and Only to be used for educational purposes
- the customer detail form is switched off
An educational licence can be activated on an unlimited number of computers. If it expires, Trikker behaves as it does for any expired licence.
3.7 Licences for an inspection body
A tailored licence exists for a partner inspection body. At startup Trikker then fills in its own body and the partner logo as the default inspection body, and the prints carry the body's details instead of an electrician's.
Such licences can cover a fixed number of named users. At startup you then choose who you are; see User.
4. The main window
4.1 The six tabs
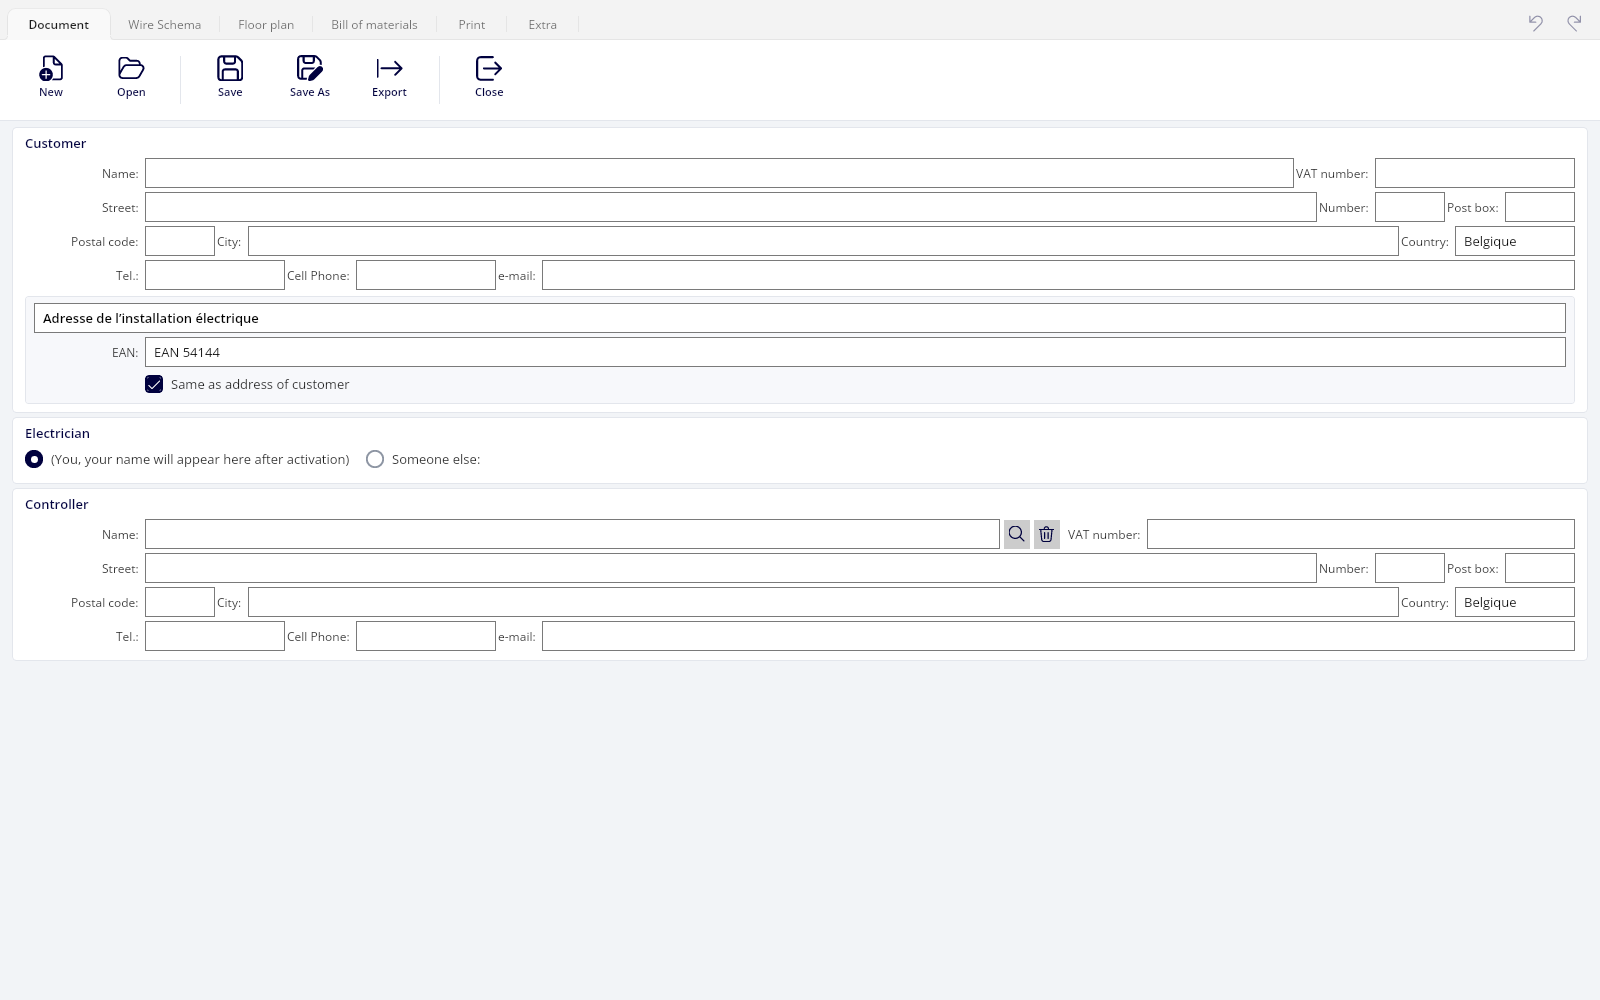
The main window has six tabs. You jump between them with the command key and 1 to 6, so with Ctrl on Windows and Command on macOS; see Keyboard shortcuts.
| Tab | What it is for |
|---|---|
| Document | The dossier details: customer, site of the installation, electrician, inspection body. |
| Wire Schema | The schematic diagram of the installation. |
| Floor plan | The floor plan, with the symbols in their real positions. |
| Bill of materials | The bill of materials, derived automatically from the schema. |
| Print | What gets printed, the title block and the preview. |
| Extra | Licence, settings, manual and remote assistance. |
4.2 New, open, save
 New (Create a new, empty document) starts a dossier with the supply side already in place.
- Open (Open a document) opens a
.trikfile. The same filter also offers.trikbackbackups and old.trikliclicence files.  Save saves the dossier in place;
  Save As asks for a new name or a different file format.
 Export (Export the document to an external format) opens the export window; see Exporting to Niko and Home Center.
 Settings (Change personal settings) opens your personal preferences.
 Manual (Open Manual (Online)) opens this manual. The shortcut is F1.
Close a changed document and Trikker asks The current document contains unsaved changes. Do you want to save the current document? A backup is made then too, before the question appears.
4.3 Drawing or selecting
Two modes sit above the drawing area, and almost everything you do depends on which one is active:
 Draw (Switch to drawing mode) to place symbols.
 Select (Switch to selection mode) to select and edit.
On the Floor plan there is a third mode, Loose Symbols (Draw symbols that don't have a link with the wire schema), as soon as you switch that option on in the settings.
4.4 Undo and redo
Undo (Step backward) and Redo (Step forward) roll every operation back or forward: adding, moving, deleting and property changes, each as a single step. The circuit numbering and the layout follow along automatically.
Make a new change after stepping back and the forward steps are gone. Closing a document clears the history.
Three things fall outside the history: changes to the settings, the user's name and signature, and adding or deleting a page on the Floor plan. The contents of a page can be recovered.
4.5 Several documents side by side
You can keep several dossiers open, each in its own window. That is also how you move symbols from one dossier to another: copy them, then place them in the other window from the library's clipboard tab.
One consequence worth knowing: the update check on starting and closing only runs when exactly one window is open.
5. Dossier details
5.1 Customer and site of the installation
All dossier details live on the Document tab. You fill them in once; from then on they appear in the title block of every print and in the header of the Excel bill of materials.
The Customer box holds the customer's details: Name:, VAT number:, address and contact details.
Below it sits Installation Address, the site address, which may differ from the customer's own address. The  Same as address of customer checkbox copies the customer address across. The same box holds the field for the connection's EAN code.
The EAN field shows the example value EAN 54144 by default. As long as that stays there, no EAN line is printed. Fill in the real code if you want it on the dossier.
5.2 Electrician
In the Electrician box you choose who appears as the electrician on the print:
- (You, your name will appear here after activation) takes the name, address and logo from your activated licence. Without activation it reads (Your name will appear here after activation)
- Someone else: lets you fill in the name, address and contact details yourself.
For the logo, choose between No logo, Print the logo next to the info and Print only the logo. You pick your own file with Choose logo file.
The Drawn by: line at the bottom of the title block always shows the licence holder from the activation, never a freely chosen name. If the licence is registered to a company, the company name and company number appear together; if it is registered to a private person, their first and last name appear. You cannot set those two independently: it follows the type of registration.
5.3 Inspection body
In the Controller box you fill in the approved body. The search button (Select from list) opens Select controller and lets you pick from the supplied list. Confirm with OK, or double-click a row: that closes the window straight away.
The clear button (Clear data) empties the fields again. In the settings you can fix a Default controller for new document, so every new dossier starts with it. On the print this block appears under the heading Authorized Inspection Body.
5.4 User
The user is the person working with the licence. For licences with several named users you choose who you are at startup. Every time you save the dossier, that name is recorded in it; on the Document tab you see it as Last changed by:
The user's name and signature only appear in the title block for an inspection body licence. For other licences the user does not appear on the print at all.
5.5 The language of the document
At Language: on the Document tab you choose the language of the document. It sets the language of the fixed labels in the title block, such as Electrician, Authorized Inspection Body and Date.
By default the document language follows the program's language: change that and the open document takes it over, and the whole title block is retranslated. After that you can set the document language separately here, and it then stays put.
6. The wire schema
You pick the symbols and their connection point. Trikker places them, wires them up and numbers the circuits.
6.1 What a new schema already has in place
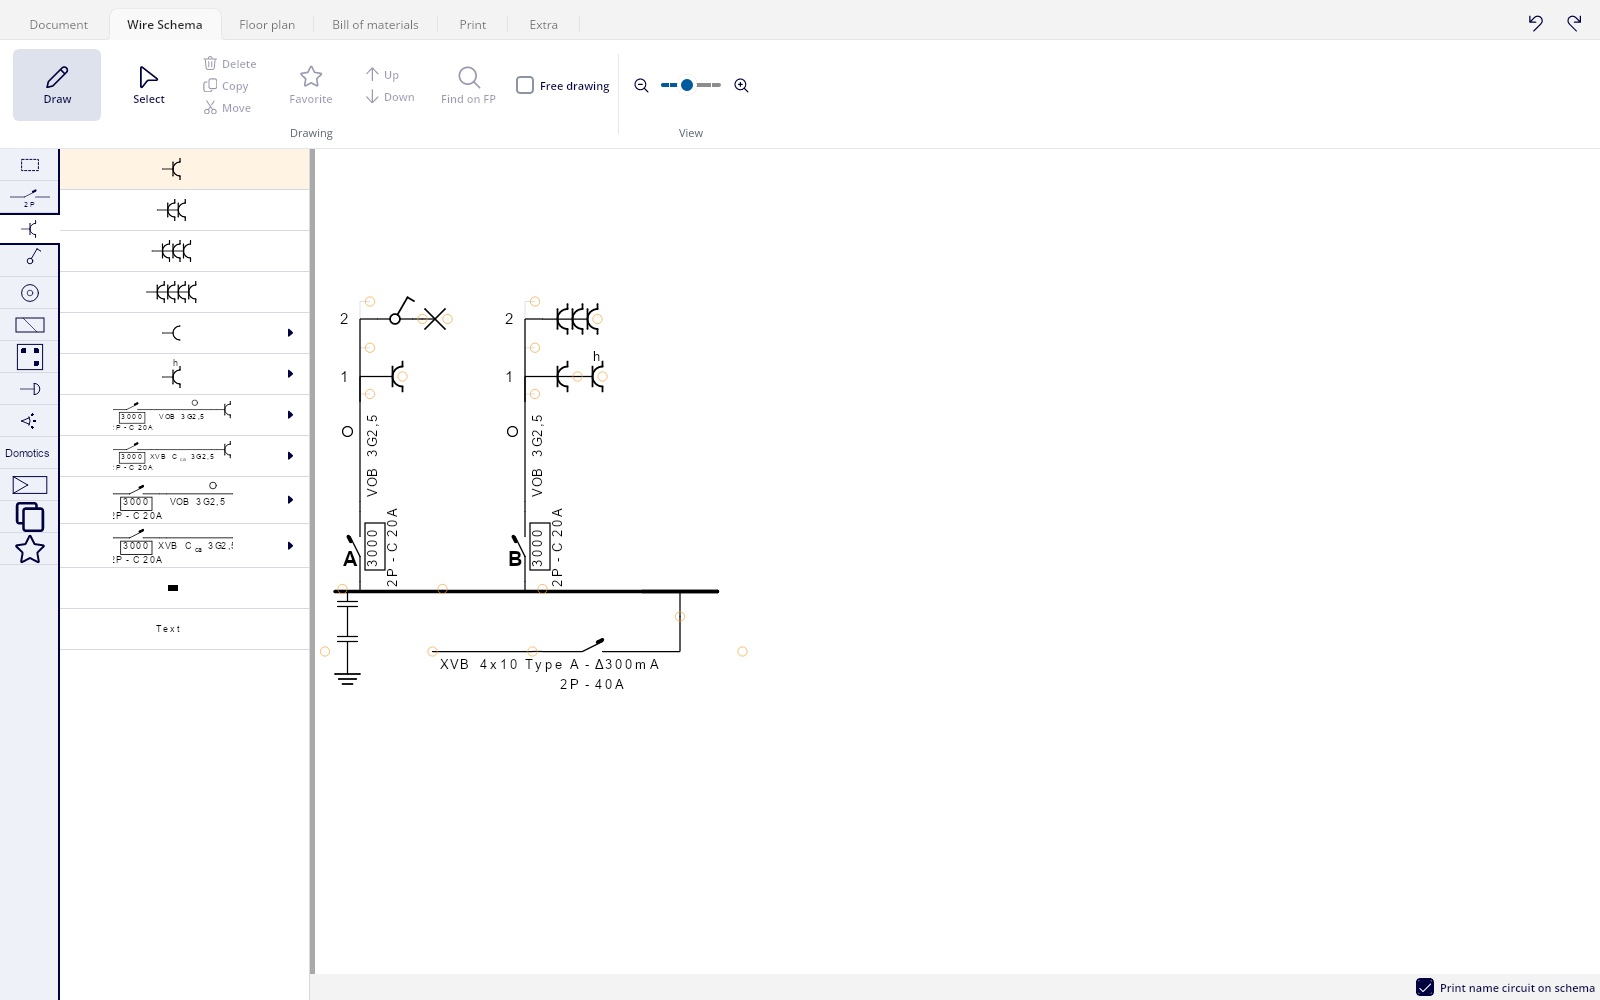
A new document does not start empty. Trikker already puts the supply side in place: a connection cable, the 300 mA type A main residual current device on it, and below that the distribution board with earthing strip and earth.
Want sensitive 30 mA devices with their own sub-board from the start? Set that in the default values; see Default values for new symbols. The meter is not included: you find it in the library under Circuit breakers, cables,…, together with ready-made connection cables with breaker and kWh meter.
6.2 Adding symbols through insert points
Choose Draw and select a symbol in the library. Insert points then appear on the schema: small orange circles at every place where that symbol may be connected.
One click on such a point inserts a copy of the symbol there. The symbol stays selected in the library, so you can place the same symbol again right away.
No insert points appearing? That symbol may not be connected at those places. Pick a suitable connection point, for example a conduit for a load. In the demo version the limit of 5 circuits may also have been reached.
6.3 Inserting a symbol in between
Click the insert point that sits on an existing symbol's connection and the new symbol is inserted in between: the existing line moves along behind it. That is how you add a breaker between the board and a circuit you had already drawn.
6.4 Extra insert points
With the Free drawing checkbox Trikker shows extra insert points (If checked, components can be added everywhere), for example to start a second branch next to an existing branch on the same conduit.
You set the size of the circles in the settings, in the Connection points box with the Size of connection points slider. On a touch screen a larger value is more comfortable.
6.5 Selecting a symbol or a whole branch
In Select mode one click selects one symbol. Click the same symbol again and you select the whole branch: the symbol with everything hanging off it. One more click returns to the single symbol.
Every button that edits the selected symbols follows that choice. That difference decides, for instance, whether  Delete removes one breaker or the whole circuit.
6.6 Changing properties
You change the selected symbol's properties in the properties window beside the drawing area. For the most-used properties there is a faster route: right-click a symbol to open a small menu on the drawing area, where you page through each property's possible values with the arrows or the scroll wheel. For a breaker that is the curve, the number of poles and the current rating; for a conduit the type and the cross-section.
The properties panel can be resized. Drag its edge if long names or values are being cut off.
6.7 Moving and reordering
- Move (Move all selected components) detaches the selection. Insert points then reappear and you click where the symbols should go. Removing and inserting happen as one step, which also undoes in one go. No insert points appear on the detached symbols themselves: a branch cannot be connected to itself.
- Move the selected symbols one step back and Move the selected symbols one step further shift the selected symbol one place between its neighbours. That is how you change the order of the circuits on the board, and with it their automatic letter.
After placing, the screen returns to Select mode.
6.8 Copying and deleting
 Copy (Copy all selected components to the clipboard) puts a copy in the library's Copied symbols tab. From there you place them through insert points as often as you like, including in another open document. There is no paste button on the Wire Schema: the copy lives in the library.
Delete (Delete all selected components) or the Delete key removes the selection. If only a symbol in the middle of a line is selected, the symbols behind it reconnect to the symbol above. If the whole branch is selected, the branch disappears entirely.
6.9 Annotations and text
The library's Annotations category holds markers, line markers and text notes in various colours.
Annotations are the exception to fixed placement: you drag them freely with the mouse, and a right-click turns them 90 degrees each time. Their position is stored in the dossier.
6.10 Why the schema shifts
You never position symbols on the Wire Schema yourself. After every change Trikker recalculates the entire layout: distribution boards lie horizontally, circuits hang vertically below them, branches that would touch move apart, and the connecting lines are drawn along with them.
A small change can therefore shift the whole schema. That is normal behaviour, not a fault: the order and the content are preserved, only the placement is recalculated. What you steer is the order and the content; the placement follows from that.
6.11 From schema to plan and back
With Find on FP (Find the selected component on the floor plan) you jump from the selected symbol to its position on the plan. The matching symbol is selected there and the drawing shifts to bring it as centred as possible into view.
The other way round,  Find on WS (Find the selected component on the wire schema) takes you from the plan back to the schema.
6.12 Conductors and their colours
For each conduit you can document the conductors and their colours. The Wire colors window shows that conduit's conductors; Add wire (Adds a new wire to the list) adds one, and the arrow buttons change the order.
For each conductor you pick a colour and a text with Choose color and tekst. Besides Basic colors and UTP Colors, Compose lets you build your own combination, with a second colour or with Don't use color 2 for a plain conductor.
7. The symbol library
7.1 The categories
The library sits beside the drawing area, with a column of tabs on the left. Each tab has a symbol as its icon; the name appears as a tooltip as soon as the mouse passes over it.
| Category | What you find there |
|---|---|
| Annotations | Markers, line markers and text notes. |
| Circuit breakers, cables,… | 2P and 4P breakers from 2 A to 63 A, residual current devices, distribution board, fuse, surge protection, 3G and 5G conduits, earthing strip and earth, meter with connection cable. |
| Sockets | Single and multiple sockets, variants without child protection or earth pin, three-phase, with built-in transformer or USB, splash-proof, plus complete socket circuits. |
| Switches & lichting | Switches (single, two-way, intermediate, double-pole, dual switching), light points, transformers, and complete lighting circuits and switching diagrams. |
| Impulse switches | Push buttons, impulse switches, dimmers, relays, timers, thermostats and time switches, with complete circuits on safety voltage. |
| Relays | Relay variants, break contacts, push-button contacts, emergency stop and twilight switch. |
| Appliance | Washing machine, dryer, cooker, dishwasher, refrigeration, ovens, boilers by energy source, heat pump, pump, valve and pre-wired junction boxes. |
| Low voltage | Doorbell circuit, transformer, sound sources, door lock, intercom, monitor and loudspeaker. |
| Security | Alarm panel, signal cables, fire, gas and smoke detectors, motion detectors, sirens, magnetic contacts, cameras and telephone dialler. |
| Domotics | Module, domotics units, touchscreen, relay and dimmer. See Domotics. |
| Solar panels, heating,… | Solar panels, inverters, home battery, car charging point, heat pump, water heater, motor, roller-shutter switch and communication socket. |
| Copied symbols | Fills itself automatically on every copy. The seven most recent stay available. |
| Favorites | Your own saved combinations and imported symbols. |
When you open a document, Sockets is ready, with the socket circuit (breaker, conduit and socket) as the default symbol.
7.2 Variants and tooltips
There is no free-text search field. You find a symbol through the category tabs and the variant lists.
- Many items are a group of variants: the visible symbol is the active variant. Hover over the arrow beside it and a panel opens with all the variants, for example every current rating of a breaker. The panel stays open as long as you move within the arrow or the panel, even across empty space, so you can pick calmly.
- Hover over a symbol and you get the description that would also appear on the bill of materials: for a composed circuit, the quantities and types of all its parts.
7.3 Saving favourites
Save a combination you draw often as a favourite.
- Select the symbols on the schema.
- Click Favorite (Save all selected symbols in the favorites category).
- The selection appears, with everything hanging off it, as one item in the Favorites tab.
Favourites are personal and dossier-independent: they are stored outside the drawing file and are available in every document. In that tab you can reorder and group items by dragging, and delete a selected favourite with the Delete key or Delete. Every change is saved immediately.
There is room for 10 favourites. At the eleventh, Trikker reports You already have too much favorites. Remove some favorite symbols first. A selection that contains the schema's starting point is not saved as a favourite.
7.4 Drawing a transfer switch
Trikker does not yet have a dedicated symbol for a transfer switch (a switch between two or more power sources, such as grid/generator or grid/inverter with battery). You draw it yourself, in one of two ways.
For a simple switch between two sources, use the Circuit breaker symbol, setting its Type property to Contact or Rotary switch. Fill in the number of poles, and the current rating if relevant.
Does the switch have a middle position or more than two positions (for instance I-0-II)? Then rename a Module symbol through its Module name property, and use the numbering of the outputs as the switch position. That shows the positions explicitly, unlike the first way.
For the connection itself, outside the schema's standard layout (for instance two paths that meet at one point), tick Free drawing.
Save the composed group as a favourite (Favorite), so you do not have to build it again every time.
7.5 More sample diagrams
For a number of specific installations there is a ready-made sample diagram. Open the file in Trikker to see how that installation is put together, or use it as a starting point for your own drawing.
- Main distribution board. How the circuits are split up over a main board: download the sample diagram.
- Solar panels, charging station and battery. The combination of solar panels with a car charging station and a battery: download the sample diagram.
- A more extensive solar panel installation. Download the sample diagram.
- A Victron installation. Inverter/charger or an AC/DC coupling: download the sample diagram.
- A relay module. How to connect and control it: download the sample diagram.
- A parallel control circuit. Download the sample diagram.
7.6 Importing your own symbol
For a symbol that is not in the library, say a manufacturer symbol or a logo, you import your own image.
- Open the Favorites tab in Draw mode. The button is only visible there.
- Click Import symbol... and choose an image file (bmp, gif, jpg, png, ico, tiff, emf or wmf).
- In the Import Symbol window, fill in Description on bill of materials:, and at Dimensions: the width in mm. The height follows the image's proportions.
- Click OK. The symbol is now ready as a favourite.
An imported symbol also gets the properties Address, Domotics function and a quantity, and it is stored in the dossier itself. You do not need the original image file afterwards.
The image may be at most 250 by 250 pixels, and the symbol's width stays between 4 and 20 mm (10 mm by default). Without Description on bill of materials: the symbol does not appear on the bill of materials.
7.7 The clipboard tab
The Copied symbols tab fills up every time you use Copy. The seven most recent copies stay there; at an eighth the oldest drops off. This is also the route for bringing symbols into another open document.
7.8 The symbol overview
The  Overview Symbols button (Overview of all symbols and their properties (PDF)) opens a PDF with every symbol and its properties. Handy to keep beside your screen, or to hand to an inspector.
8. Circuit numbering
8.1 Automatic circuit letters
Every symbol that starts a new circuit, typically a breaker or fuse directly below the distribution board, gets the next free letter, in the order the circuits appear on the schema. After Z the series continues with AA, AB, and so on.
Symbols inside the circuit inherit its letter. You do not have to do anything. The letters and sequence numbers are not stored in the file but recalculated on opening, so they can never drift out of step with the drawing.
Symbols before the distribution board (meter, main protection) get no letter, and earthing symbols are never numbered. A residual current device only gets its own letter if you set Mark RCD to Yes; the default is No.
8.2 Giving a fixed letter
Want to keep the letters of an existing installation? Select the symbol that starts the circuit and fill in Fixed mark circuit. That letter is used exactly as given and held out of the automatic series; the other circuits renumber around it. Fixed letters are reserved across all boards.
With Circuit name you give the circuit a free description, for example kitchen sockets. The Print name circuit on schema checkbox (If checked the name of the circuit will be printed on the schema) puts that name on the schema. With Position mark circuit you choose where the label sits next to the symbol.
8.3 Several distribution boards
Fill in the Number property on a distribution board. Every circuit behind that board gets that number as its prefix, exactly as you typed it, and the letter count restarts per board.
Trikker adds no separator of its own: type it in if you want one. 1/ gives 1/A, 1/B and so on; 2 gives 2A, 2B. A number made up only of spaces is ignored.
Give every board its own number. Two boards with the same number each keep their own letter count, so the same label can appear twice.
8.4 Sequence numbers within a circuit
Load points hanging behind a conduit inside a circuit automatically get a sequence number within that circuit: the sockets of circuit A become A1, A2, A3.
To stop a symbol starting its own sequence number, set its Start Sub-circuit property to No. The default is Automatic.
8.5 Printing the list of circuits
Tick  Print circuit list on the Print tab to print an extra Circuit list page: per circuit the letter in bold, with the circuit's name next to it.
You choose the order with  Alphabetic or
  As on the schema. Alphabetical puts short letter groups before longer ones (Z before AA) and compares numeric parts as numbers (9 before 10).
A circuit whose fixed letter is a space drops out of the list. That is intended: it is the way to feed a sub-board without using up a letter.
9. The floor plan
The floor plan of the building, with the wire schema's symbols in their real positions.
9.1 Drawing the floor plan
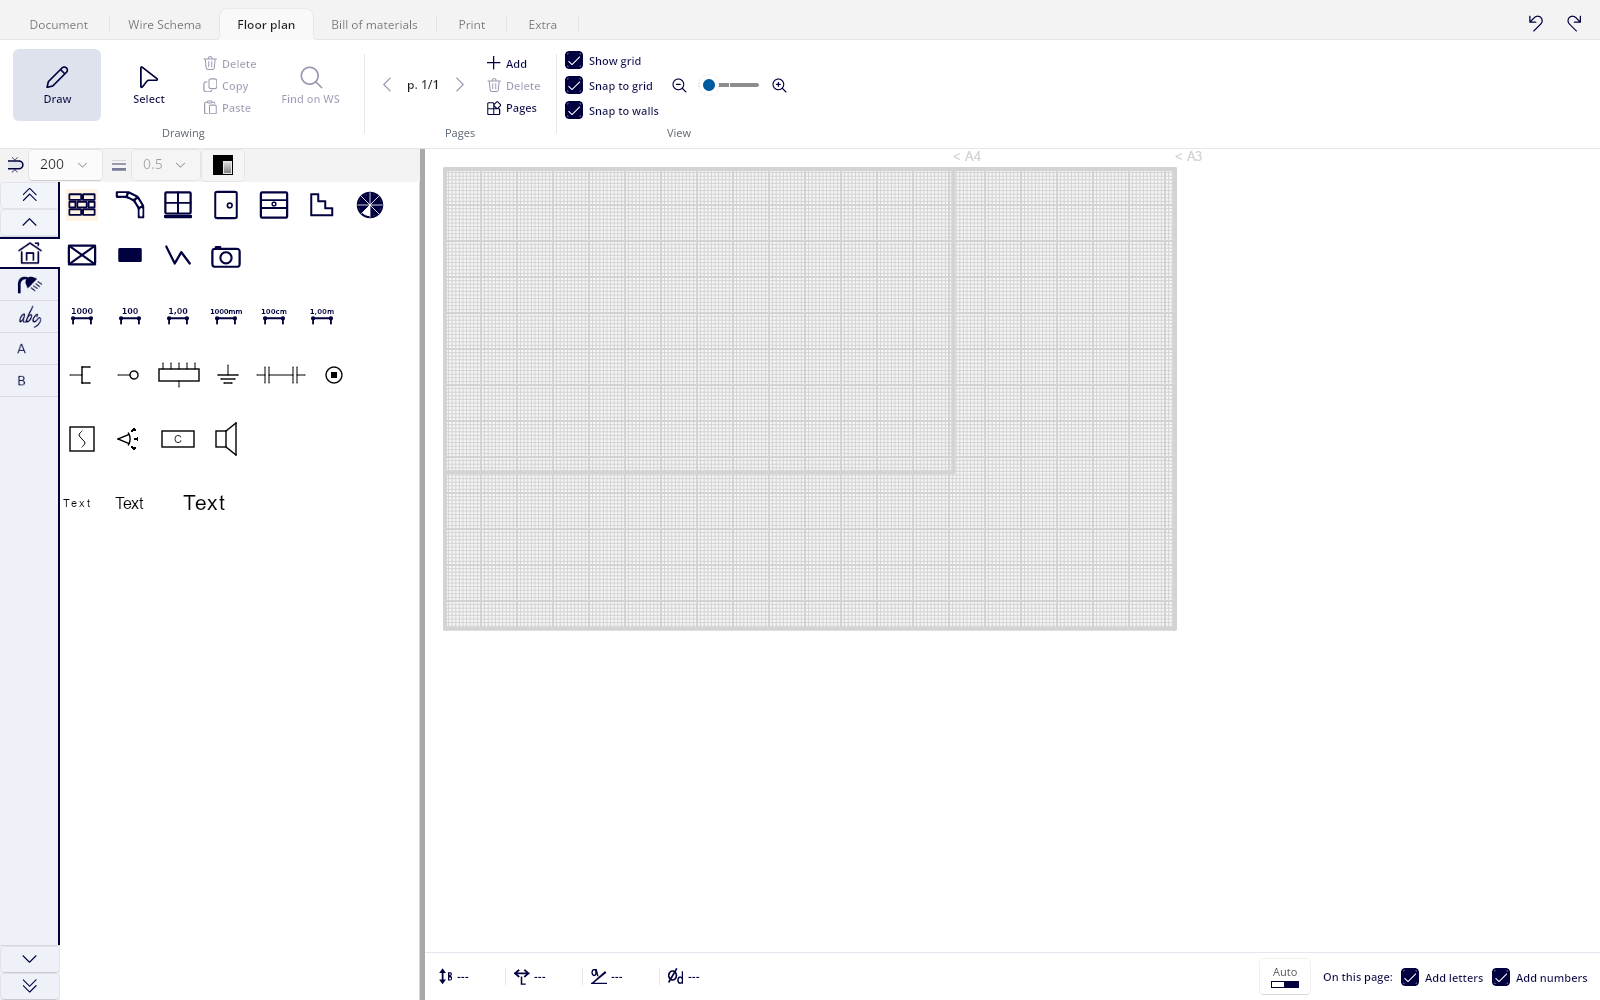
The first library tab, the one with the house, holds the building elements: Wall, Round wall, Window, Door, Garage door, Staircase, Spiral staircase, Rectangle, Area and Lines.
You draw each element with two clicks, start point and end point. The plan is drawn in real millimetres. The width of walls, windows and doors is set with The default width of all walls, windows and doors; the thickness of lines with Line width. Those lists are only usable when the matching tool is active or such an element is selected.
9.2 Dimensions, text and clip art
Below the building elements sit six variants of the dimension line: in mm, cm or m, each with or without the unit after the number. Next to them is a set of symbols that need no counterpart on the schema, such as Media socket (UTP, Tel), Connection point, Switchboard, Ground, Fire detector, Detector and Speaker, plus standalone text boxes in three sizes.
A clip-art tab holds images such as Bath, Shower, Toilet and Car. A text tab holds standard room labels, from Basement and 1st floor to Attic and Garden.
Text on the plan is edited in place: click a selected text again, or double-click it. You finish with Esc (the text stays) or with the command key and Enter.
9.3 Importing an existing plan
With Import drawing you bring in an existing building plan as an underlay. The file filter offers images (bmp, gif, jpg, png, ico, tiff, emf, wmf), AutoCAD (dwg, dxf) and PDF.
For a PDF or DWG a detail window then opens where you choose what to use:
- Page / Layout: the PDF page or the CAD layout.
- Layers: tick drawing layers on or off, for instance to hide dimensions or furniture. Enable all layers and Disable all layers do it in one go.
- Selection: crop out the relevant part of the plan.
- All the same color: draws the whole plan in one colour, chosen with Choose color....
The imported plan becomes the page background and stays stored inside the Trikker file; you do not need the original file afterwards. To adjust it later, use Edit drawing. Ordinary images are placed on the plan as a figure.
Choose a .dxf file and the import fails with The file could not be loaded. The filter does offer .dxf, but loading it is not finished yet. Save the drawing from AutoCAD as .dwg or as PDF.
9.4 Placing the schema's symbols
For every circuit on the Wire Schema the library shows a tab with the circuit letter. Select a symbol and click on the plan to place it.
Symbols with a wall connection point (sockets, communication sockets, connection points and sound sources such as bell, buzzer and siren) snap to a nearby wall when placed and turn with that wall. Other symbols, such as switches and loudspeakers, follow the grid.
A symbol becomes unavailable in the library as soon as it has been placed as often as the schema asks. A light point with quantity 3 therefore appears three times in the circuit tab. As soon as *all* of a circuit's symbols are on the plan, the circuit letter turns from black to grey, and the library jumps on to the next incomplete circuit.
A symbol missing from the circuit tab? Its On floor plan property is set to No. That is always the case for conduits: they never appear on the plan.
9.5 Rotating, mirroring and colouring symbols
For each placed symbol, Text position decides where the circuit label sits, and Rotate the selected objects horizontally, Mirror the selected objects horizontally and Mirror the selected objects vertically rotate or mirror it.
The colour button (The color of all symbols) opens a colour picker and applies the colour to the selection or to the active drawing tool. With Lock you pin a placed image so you cannot drag it by accident; Unlock releases it again.
In selection mode you move with the keyboard: an arrow shifts the selection one grid step, Alt and an arrow one tenth of that, Shift and an arrow only the first end point, and the command key with an arrow only the second end point.
9.6 Grid, snapping and transparent mode
 Show grid (If checked, the grid lines will be shown) shows the grid lines.
 Snap to grid (If checked, components will be placed exactely on grid lines) restricts you to drawing exactly on the grid.
 Snap to walls (If checked, wall ends will act 'magnetic') makes wall ends magnetic, so they close neatly onto each other.
- Transparency mode (Turn transparency mode on or off) makes the building elements translucent. Handy for tracing over an imported underlay.
Hold the command key while drawing a wall, door or window and it lands perfectly horizontal or vertical.
9.7 Reading the status bar
At the bottom of the drawing area a status bar shows four measurements of the element you are drawing or have selected: the width and length in mm, the angle in degrees, and the diameter in mm for a curved wall.
As long as no element is active it shows ---. The values update live while you draw, so you can put a wall down at the right size without measuring afterwards.
9.8 Working with several pages
A floor plan can have several pages, for example one per storey. At the bottom of the screen sits the  Pages group:
- Go to previous page and Go to next page to page through.
- Add a page and Delete this page. On deleting, Trikker asks Do you want to delete page {0}?
- Rearrange pages + extra settings opens the Pages window, where you name pages, reorder them and insert new ones (Insert a new page here).
Adding or deleting a page falls outside Undo (Step backward). The contents of a page can be recovered. In the demo version the number of pages stays limited to one.
9.9 Setting the scale
For each page, the scale label on the plan opens the Scale window with two options:
- Automatic fits the plan to the sheet. Symbols keep a fixed size relative to the plan, as in older versions of Trikker.
- Manual: lets you pick a real drawing scale, for example 1:50, together with the Symbol height: at which symbols appear on paper.
Reset resets everything (Reset all values to their default values.). If the plan does not fit the paper at the chosen scale, the window warns with The floor plan is too wide! or The floor plan is too high!, followed by Adjust the scale or paper size. A red exclamation mark then appears on the plan's scale label.
A page can also take a Compact frame: a narrow strip with only the title and the page number instead of the full title block, leaving more room to draw.
9.10 Loose symbols
Want to place symbols on the plan that are not on the Wire Schema yet? Switch on Allow loose symbols to be added on the floor plan in the settings. The window puts it like this: If you enable this option you can add loose symbols to the floor plan. Loose symbols are symbols that are not linked to a symbol on the wire diagram. You can add loose symbols to the wire diagram afterwards.
Draw such a symbol on the schema later and the new schema symbol takes over the existing placement on the plan. In Loose Symbols mode the library tab holds no palette but a thumbnail view of the plan, with Select previous loose symbol and Select next loose symbol to track down the loose symbols one by one.
9.11 What syncs between the two drawings
| Direction | What follows |
|---|---|
| From schema to plan | The symbol's appearance, its properties and the circuit label. Renumber circuits or change a symbol and the plan follows automatically. |
| From plan to schema | Nothing. Moving, rotating or colouring a placed symbol does not change the schema. Only the position, rotation, colour and the placement of text and address belong to the plan itself. |
| Deleting on the schema | The symbol disappears from the plan. |
| Deleting on the plan | The symbol becomes selectable again in the circuit tab, and a circuit letter that becomes incomplete again goes back to black. |
One schema symbol may appear several times on the plan.
10. Domotics
10.1 The Domotics category
In a domotics installation the control does not run through classic switching wires: a push button sits on a bus or works wirelessly, and the controller switches the loads through output modules in the board. On a wire schema you can therefore no longer read which button operates which light point, because there *is* no drawn connection. Trikker solves that with addresses.
The Domotics category holds a breaker with conduit and module to start a domotics circuit, a standalone module symbol, domotics units (push button with one, two or four buttons, switch, socket, light point), a touchscreen unit, terminal and connection point, plus relay and dimmer variants.
10.2 The domotics module
The module symbol is a rectangle with one supply point on the left and outputs on the right; its height grows with whatever hangs below it.
- Module name puts a text inside the symbol, for example the product name or Controller.
- Output names gives the outputs their own name, in order. That name then replaces the sequence number on the schema.
- Mark set to Yes (the default) makes the module itself count in the numbering; on No it is skipped.
- Input symbol and Output symbol draw voltage symbols on the input and output side, so the same symbol also serves as an inverter.
10.3 The control strip
Above a domotics unit a narrow strip shows with pictograms how the point is operated. Four properties each drive one pictogram: Push button, Wireless, Programmed and Detection. The strip widens as you switch more of them on.
The strip only exists as the top part of such a combined symbol. Its properties simply appear in the unit's properties window.
10.4 Filling in addresses
Almost every load and control symbol, and every domotics unit, has the properties Address and Domotics function.
- Fill in your domotics system's address code at Address. That is free text.
- At Domotics function choose Input for a control point or Output for a controlled load.
- Give the control point and the loads it operates the same address.
Addresses are compared as text, character for character. One space or typo too many and the link is gone. Control symbols such as push button and switch default to Input, loads such as light point and socket to Output.
10.5 What you see on the drawings
On the Wire Schema the address is drawn in small italics beside the symbol. For a symbol with function Input a second line appears below it, in brackets with an arrow, for example (→A1, B3): the circuit labels of every output carrying the same address. That way you read straight off the schema which loads a push button operates.
That reference recalculates itself on every change and is not stored in the file, so it can never go stale.
On the Floor plan a placed symbol shows its address in the same small italics. As long as the address is visible and Text position is set to Automatic, the symbol shows the address instead of the circuit label: for a domotics installation that says more. Want both? Set Text position to a fixed position.
On the bill of materials addresses are ignored. Ten identical push buttons with ten different addresses stay one line with quantity ten.
11. The bill of materials
11.1 Viewing the list
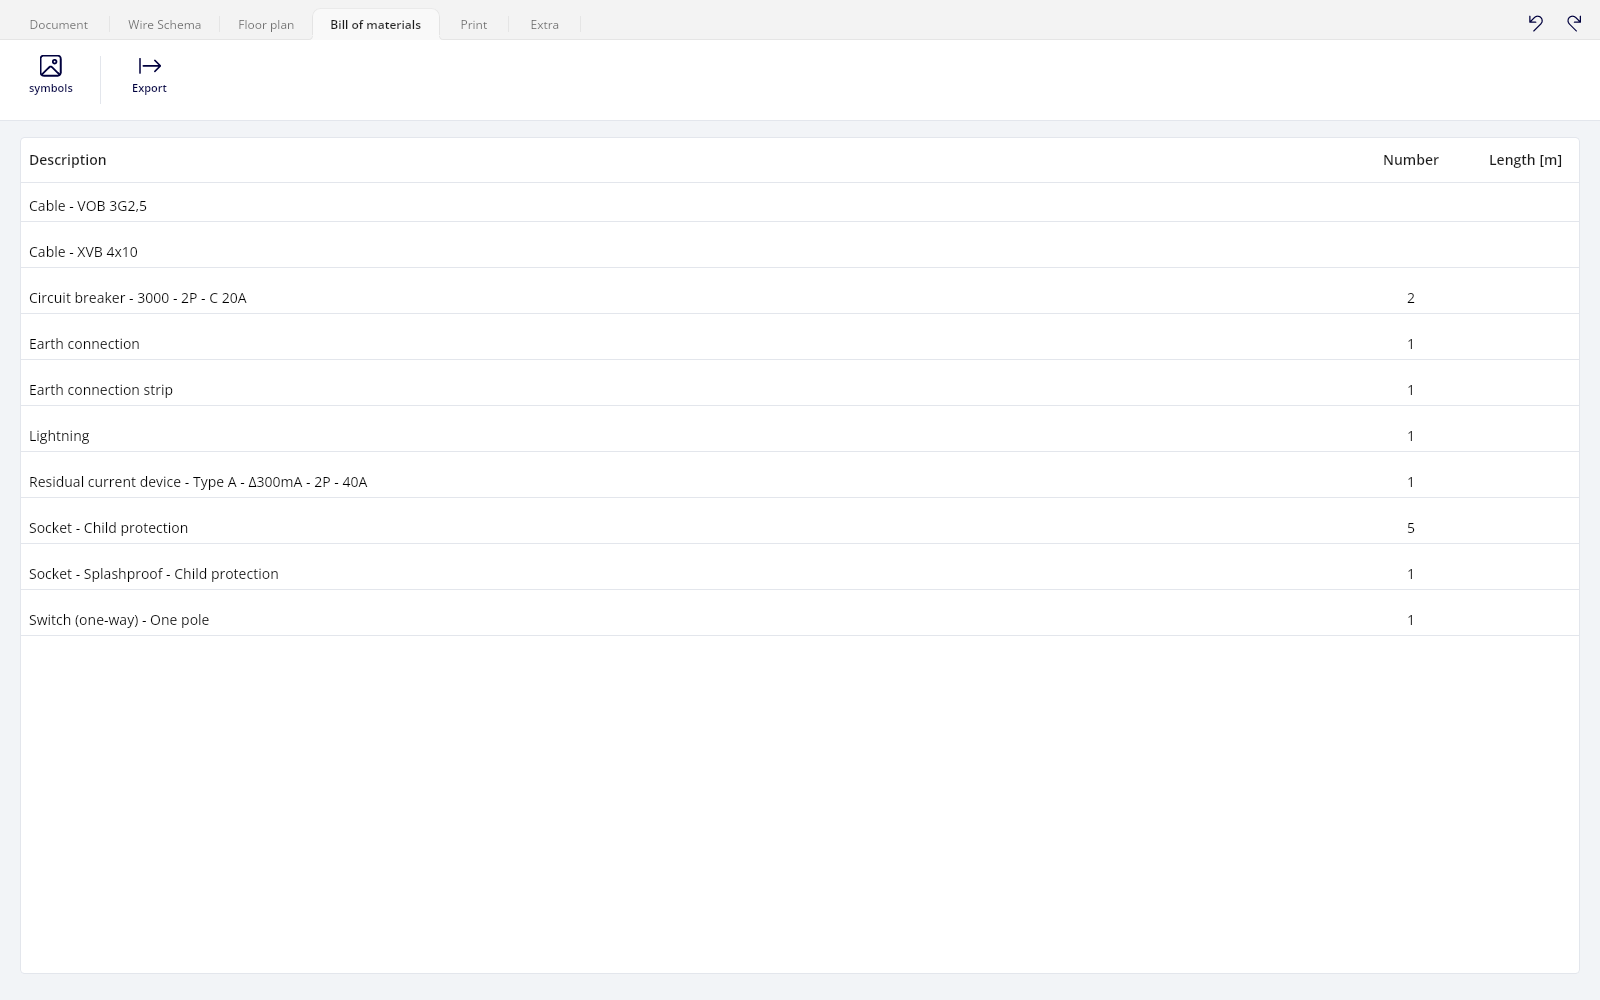
Open the Bill of materials tab. The list is rebuilt from the dossier at that moment and sorted alphabetically, so changes to the schema are in it right away. The list can never lag behind, because it does not exist as a separate record.
For each component you see a symbol drawing (optional), the description, the quantity and the length in metres. The length column is only filled in for conduits. The Include symbols in list checkbox decides whether every line gets a drawing; that choice is stored in the dossier and applies to the Excel export too.
11.2 What counts and what does not
Select a symbol on the schema and set On bill of materials to Yes or No in the properties window.
For a distribution board, an appliance, a small appliance, a boiler and a note this is set to No by default. Want them on the list? Set it to Yes yourself.
- Identical components are merged into one line with the total quantity.
- If a symbol has a quantity property, for example a multiple socket, that quantity counts instead of one per symbol. A fuse counts per pole.
- An imported symbol without Description on bill of materials: does not appear on the list.
- Placing or omitting symbols on the plan changes nothing on the list. Quantities come exclusively from the schema; only loose symbols that exist on the plan and nowhere else count directly.
11.3 Adding up cable lengths
Fill in Length on schema per conduit, and if you like + extra on bill of materials for metres you want to order on top.
Identical conduits are merged onto one line, and the total is rounded up to whole metres. That the list comes out slightly above the sum of your entered lengths is therefore intended: you order in whole metres.
11.4 Exporting to Excel
Click Export (Export bill of materials to Excel). Trikker suggests the dossier name as the file name and saves an Excel file.
The sheet starts with the customer's details (name, company number, address, phone, mobile and email) and a separate Site line with the site address, followed by the same table as on screen.
At the top sits the customer's own address on purpose, not the site address. The site address is on the Site line, and that line only appears if you filled in a site street.
12. Printing and PDF
The whole dossier as one print job, with title block, signatures and continuous page numbering.
12.1 Choosing what goes into the dossier
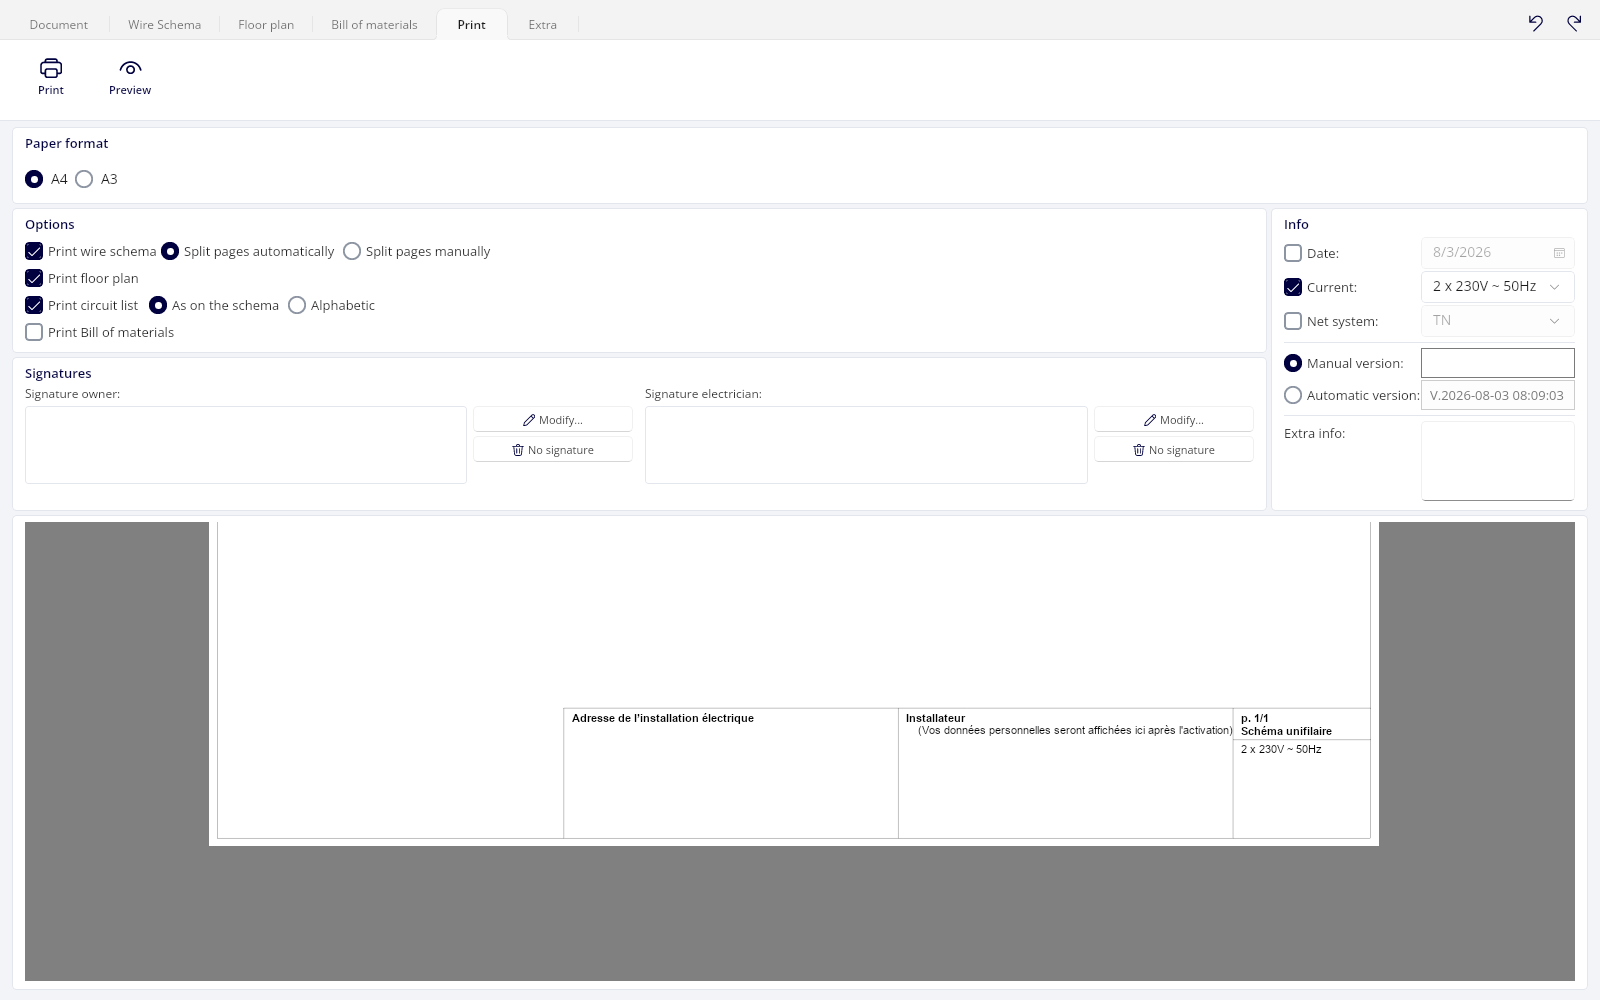
Everything about printing sits on the Print tab. Tick what should be in the dossier:
 Print wire schema
 Print floor plan
- Print circuit list
 Print Bill of materials
Every page gets the same title block with the dossier details, the date and continuous page numbering, so the dossier is recognisable as one whole.
12.2 Paper size
In the Paper format box choose A4 or A3. The larger A2, A1 and A0 sizes only appear once you have ticked Activate large paper sizes. in the settings.
Printing is always landscape; portrait does not exist. The schema's drawing scale is calculated automatically so it fits the page height.
12.3 The title block
At the bottom of every page Trikker prints a frame with:
- Installation Address, with the customer and site details from the Document tab and, if you filled it in, the EAN code;
- the Electrician, with the logo according to the chosen option;
- Authorized Inspection Body, as soon as it is filled in;
- the page number with the page type;
- the signature stamps of owner and electrician;
- optionally, in the Info box:
 Date:,
  Current:,
  Net system:, a version number and Extra info:
With  Automatic version: Trikker fills in the time of the last change itself. The field is read-only and updates as soon as the document changes. With
  Manual version: you type a version text yourself and manage it yourself.
The texts in the title block follow the language of the document, not that of the program. See The language of the document.
12.4 Signatures
In the Signatures box you set Signature owner: and Signature electrician: through  Modify.... In the editor you can choose a photo with Choose file... and crop it, or draw one yourself with Draw yourself... (Draw your signature below:).
An imported signature is adjusted with the Rotate left, Larger, Darker and Reposition buttons.  No signature removes it again. The signatures print at the bottom right of every page.
12.5 The print preview
At the bottom of the tab, across the full width, sits a continuously updated preview of the title block. The  Preview button opens the Print preview window, with paging buttons and Configure printer....
On large documents it takes noticeably long to build, so a waiting window appears (Please wait...) with the text The print preview is being loaded. That window cannot be cancelled or closed; it disappears as soon as the preview is actually on your screen.
Without a printer on your computer, Trikker refuses the preview with There seems to be no printer installed on your computer. Therefore no print preview can be generated. The preview needs a printer driver; Microsoft Print to PDF is enough.
12.6 Creating a PDF
The Print button creates a PDF. It is requested from the server while you choose in the save window where the file should go, and then opened in your default PDF reader. Cancel the save window and nothing is written. The same works from Print preview.
Trikker creates the PDF on its servers. Printing therefore needs your permission to send the dossier, and does not work offline. See Terms of use and data processing and Privacy.
12.7 Spreading the wire schema over sheets
A wide schema rarely fits on one sheet. You choose how it is spread:
 Split pages automatically scales the schema to the page height and chooses vertical cut lines itself, always where no symbol is cut through. Directly connected symbols, such as a switch and its light point, stay together on one sheet.
 Split pages manually lets you set the cut points: set the Start on new page property to Yes on the first symbol of a new sheet. The print scale is then tuned to the widest section and to the page height.
In automatic spreading too, Start on new page is honoured: a new sheet starts there regardless, and the automatic cut lines fill in the rest.
Page boundaries are only visible in the print, not on the drawing area. Judge the spread through Preview.
12.8 Watermarks
| Situation | What appears on the print |
|---|---|
| No valid licence | Trikker - Not yet activated - in light grey, repeated across every page and every export. |
| Educational licence | Trikker - Only to be used for educational purposes at the top of every page, with Made with Trikker in the title block and a red stamp across the page. |
| Inspection body licence | The body's details instead of the electrician's. On opening the Print tab, Print wire schema is unticked by default. |
13. Exporting to Niko and Home Center
13.1 The export window
Export opens the Export to external software window. Select a format. Your .trik file will not be modified. You pick one of three formats, and the save window only opens *after* that choice. Click Cancel and the export stops immediately: no save window, no file.
After an export the document itself still counts as unsaved. So save your dossier as a Trikker file as well.
13.2 Niko Home Control
Niko Home Control 2 delivers Floor plan image sized for NHC 2 — recommended for new installations, and Niko Home Control 1 Floor plan image for older NHC 1 installations only. The result is one PNG image of all floor plan pages, within the limits Niko imposes.
Only the floor plan pages are exported, not the Wire Schema. If your dossier holds no floor plan page at all, this export stops silently: draw at least one page first.
If the plan is too detailed for the Niko limit, Trikker tells you and asks you to simplify it.
13.3 Home Center
Home Center Exports the full project to a Home Center project file. The package holds one image per page plus a list of the placed symbols with their type, address and position. If a symbol has no address of its own, the parent symbol's address is passed along.
Unlike with Niko, the package also contains a copy of the complete document, so including the Wire Schema.
14. Backups and recovery
14.1 Setting up automatic backups
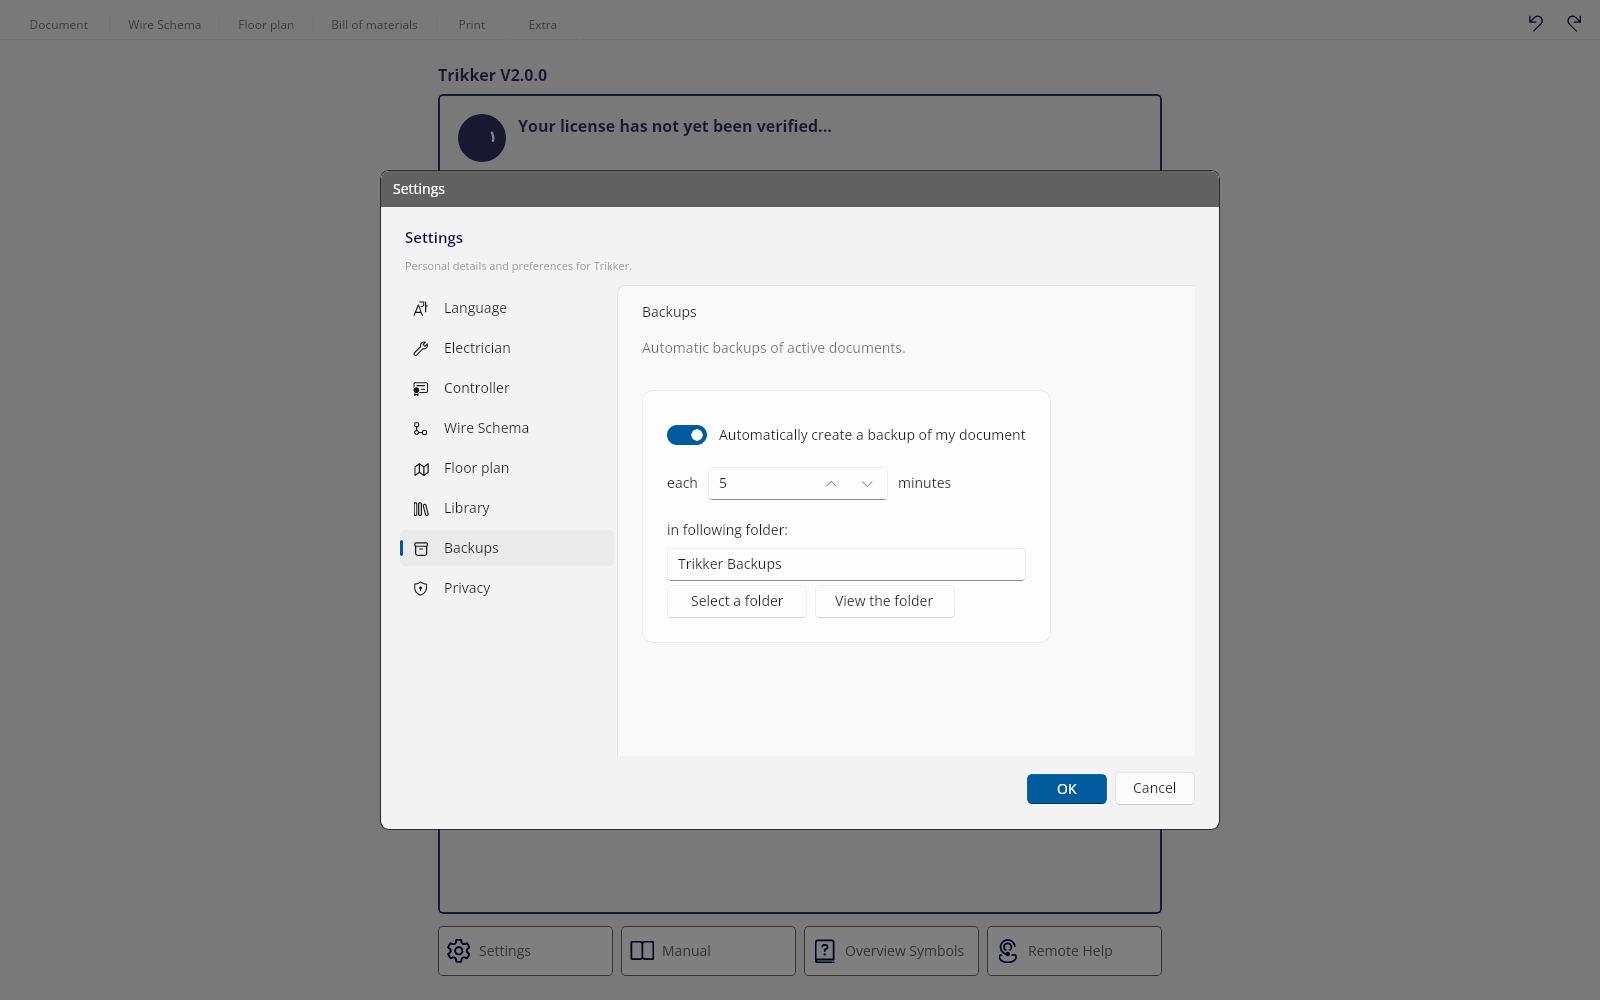
While you draw, Trikker automatically keeps backup copies of your document, as files with the extension .trikback. That is your safety net after a crash, a power cut or a damaged file.
Open Settings and the Backups tab. There you find the Automatically create a backup of my document checkbox, the interval (each ... minutes) and the target folder (in following folder:), with Select a folder and View the folder.
By default the feature is on, runs every 5 minutes and writes to the Trikker Backups folder in your Documents. The interval stays between 1 and 20 minutes.
14.2 What gets saved
Trikker makes a backup at every interval, but only when the document has changed since the previous one. If nothing changed, no identical copy is written.
A backup is also made on every successful save and when you close a changed document, even before the question of whether to save. The name follows a fixed pattern: Backup - 2026-08-31 14.05.33 - My house.trikback. A document that has never been saved is called New Document.
Up to 5 different backups are kept per document; after that the oldest drops off each time. Backups from earlier sessions or under a different document name are never cleaned up automatically, so you may delete those yourself once you no longer need them.
14.3 Restoring a backup
- Click Open.
- Choose the file type automatic backups in the file window. By default it is on Trikker files.
- Browse to the backup folder. Not sure where it is? Use View the folder on the Backups tab.
- Open the file you want. If there are several, take the most recent time in the name.
- The document opens as an ordinary document; the title bar shows Automatic backup with the time.
- Click Save. Trikker asks for a name and location for a new Trikker file.
The backup file itself is never overwritten. That Save asks for a name is therefore intended.
14.4 A file that no longer opens
If opening a .trik file fails, Trikker reports The selected file could not be loaded. in the Trikker - Failed to load document window. Restore the most recent backup as above and save it under a new name.
If the document was made with a different program version, Trikker quietly sets aside an extra copy of the original file when opening it. That copy lives in the AutoBackup/OtherVersion folder inside the program's user folder, with a subfolder per version transition.
If a backup itself fails, Trikker only notes it in the log and you see no error message. So check now and then with View the folder that copies really are in the folder.
15. Settings
15.1 Opening the window

Click Settings (Change personal settings). The Settings window opens with a column of tabs on the left: Language, User, Electrician, Controller, Wire Schema, Floor plan, Library, Backups and Privacy.
Which tabs you see depends on your licence. User appears for licences with several named users or for an inspection body; with such a body licence, Electrician and Controller conversely disappear.
Settings fall outside Undo (Step backward).
15.2 The language of the program
On the Language tab a dropdown sits at Language:. Trikker is available in six languages; each entry appears in its own spelling, with the French and English name beside it:
Nederlands / Néerlandais / Dutch, Français / Frans / French, English / Anglais / Engels, Deutsch / Allemand / Duits, Polski / Polonais / Pools, Română / Roumain / Roemeens
As soon as you pick another language, the window retranslates itself and the main window follows. No restart is needed. On closing the window, the open document takes over the program language as its document language; after that you can set it separately on the Document tab.
At the first start, before a settings file exists, Trikker chooses the language based on your operating system. English is never chosen automatically: that one you pick yourself.
15.3 Default values for new symbols
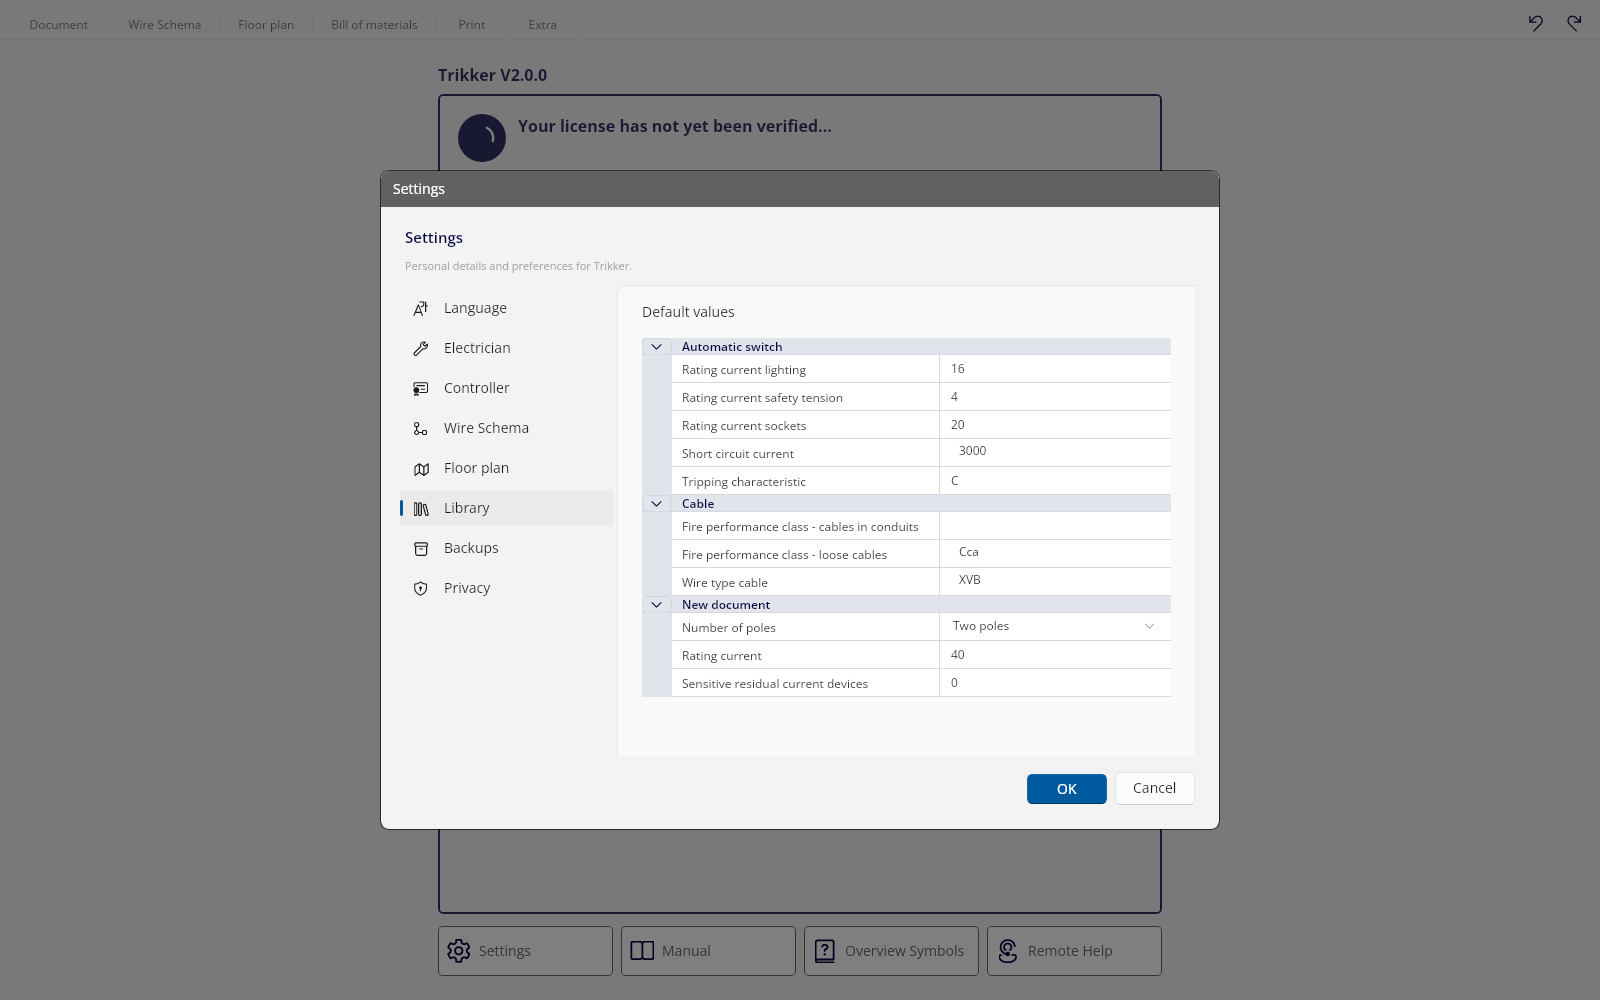
The Library tab holds the Default values box. These are the values that prepare symbols from the library and the starting schema of a new document. Set them once to match how you work, and every new symbol gets them from then on.
| Section | Property | Default |
|---|---|---|
| Automatic switch | Short circuit current | 3000 |
| Automatic switch | Tripping characteristic | C |
| Automatic switch | Rating current sockets | 20 |
| Automatic switch | Rating current lighting | 16 |
| Cable | Wire type cable | XVB |
| New document | Rating current | 40 |
| New document | Number of poles | Two poles |
The New document section sets the starting schema of every new document. The main residual current device always gets at least 40 A, even if you set a lower value. At Sensitive residual current devices you say how many sensitive 30 mA devices, each with their own board, appear on the board from the start; the range is 0 to 10.
Default values only work forward. They apply to symbols you place *after* the change and to documents you create afterwards; symbols already on the schema keep their own values. The example symbols in the library do adapt immediately.
15.4 Privacy
The Privacy tab holds the two choices you made at the first start. Bepaal wat Trikker met je dossiers mag doen. Je kan deze keuzes op elk moment wijzigen.
- Mijn dossier naar de Trikker-servers verzenden om de PDF aan te maken. Als je dit uitzet, kan er niet meer afgedrukt worden.
- Trikker mag een verzonden dossier geanonimiseerd bijhouden om nieuwe functies te ontwikkelen. (optioneel)
Both are off by default and stored per user of your computer. They are edited here like any other setting: with Cancel the change is discarded, with OK it is applied.
15.5 The other tabs
- User your name, and for an inspection body also the number and the signature. As long as the name is empty, OK stays blocked.
- Electrician your own Contact details, Logo and Signature. The fields show the details from your licence as example values.
- Controller the Default controller for new document, so every new dossier starts with it.
- Wire Schema the Connection points box with Size of connection points, and the Circuit letter text size:
- Floor plan the Loose Symbols box with Allow loose symbols to be added on the floor plan, and Activate large paper sizes. for sizes larger than A3.
15.6 Where your settings are kept
Your settings are kept per user of the computer in a file Instellingen.xml, in the %APPDATA%\Bluebits\Trikker folder on Windows. Everything above lives in it, including your logo and your signatures. The same folder also holds your favourites, the list of inspection bodies, downloaded updates and the extra copies made at a version transition.
The settings are written on normal shutdown of the program, not on every change. After a crash, that session's changes are therefore gone.
You back up your settings by copying Instellingen.xml while Trikker is closed. Restoring works the other way round: close Trikker, put the file back, start Trikker. That is also how you take your preferences to a new computer. Trikker makes no automatic copy of this file itself.
16. Internet and working offline
16.1 What goes over the internet
- The licence. On activation your licence code and an identification of your computer go to the licence server; Trikker gets a signed licence proof back and keeps it locally. On every start it quietly tries to renew it.
- The PDF of your dossier. It is created on Trikker's servers, so printing needs a connection and your permission.
- The update check, on starting and closing.
- News items, once on starting. They appear at the top of the Document tab, next to New and Open. If there are several, they alternate every five seconds.
- Usage and error statistics, on starting, closing and on program errors. They contain the program version, your operating system version, your language, your licence number and computer identifications, but no documents.
- Web addresses and the list of inspection bodies. Buttons that lead to the website ask for the current address first; if that fails, Trikker uses a fixed address.
- The time check, when the licence proof is assessed.
16.2 What stays on your computer
Your drawings. Trikker does not keep your dossiers in the cloud. A dossier is a file you save wherever you like. There is no document synchronisation and no online backup from Trikker.
Your settings. They stay on your computer and are not synchronised between computers.
A dossier missing on another computer is not a synchronisation problem: the file only exists where you saved it. Move it across yourself.
16.3 Working without internet
Without internet, drawing simply carries on: drawing, saving and exporting to Niko or Home Center work entirely offline. The locally kept licence proof stays valid for a while, and as long as it does, Trikker starts as the full version.
Two things do not work offline: creating the PDF, and renewing the licence. The update check and news are skipped silently; statistics messages that cannot be sent are kept and retried later.
Stay offline too long and Trikker falls back to the demo version. As soon as there is a connection again, Connect with license server in the licence screen is enough to restore the full version.
17. Keyboard shortcuts
17.1 The command key
Trikker never ties its shortcuts to the physical Ctrl key itself. Every shortcut uses the command key, which is Ctrl on Windows and Command on macOS. The tables below therefore say Ctrl; on a Mac, read Command.
On macOS, Ctrl is *not* an alternative to Command: that key belongs to the operating system itself (Ctrl and click is the secondary click, Ctrl with the arrows switches desktops). Trikker uses none of it.
17.2 General shortcuts
| Key | What it does |
|---|---|
| F1 | Open the manual. On macOS also with Command, Shift and /. |
| Ctrl+S | Save the document. |
| Ctrl+1 to Ctrl+6 | Go to tab 1 to 6. |
| Ctrl+P | Go to the Print tab. |
| Ctrl+Z | Undo (Step backward) |
| Ctrl+Y or Ctrl+Shift+Z | Redo (Step forward) |
While you type in a text field, the shortcuts for copy, paste, cut, select all, undo and the arrows stand down: they belong to the text then. Saving, switching tabs and opening the manual keep working.
17.3 Shortcuts while drawing
| Key | What it does | Where |
|---|---|---|
| Ctrl+D | Switch to drawing mode | both drawings |
| Ctrl+E | Switch to selection mode | both drawings |
| Ctrl+L | Draw symbols that don't have a link with the wire schema | plan |
| Delete or Backspace | Delete the selection | both drawings |
| Ctrl+C | Copy | both drawings |
| Ctrl+X | Move | schema |
| Ctrl+V |  Paste Paste | plan |
| Ctrl+A | Select all | plan |
| Ctrl+left or right arrow | Shift the selected symbol one place | schema |
| Esc | Cancel the current action | plan |
| Arrows | Move the selection | plan |
| Shift+arrow | Move only the first end point | plan |
| Ctrl+arrow | Move only the second end point | plan |
| Hold Alt | Move in steps of one tenth | plan |
| Hold Ctrl | Stay on the main axis while dragging | both drawings |
| Shift and right-click | Rotate the text placement | plan |
| Ctrl and right-click | Rotate the address placement | plan |
| Scroll wheel | Zoom in or out | both drawings |
| Shift and scroll wheel | Scroll horizontally | both drawings |
| Ctrl and scroll wheel | Scroll vertically | both drawings |
| Space bar and drag | Pan the drawing area | both drawings |
On a Mac you scroll with two fingers and zoom by pinching. Dragging with the middle mouse button does not work there; use the space bar with the left button.
17.4 Keys Trikker does not use
| Key | Why Trikker does not use it |
|---|---|
| Command+Q and Command+W on macOS | Quit and close window belong to the operating system's menu. |
| The right Command key on macOS | It is not passed to the program. Use the left one. |
| Ctrl with anything on macOS | That belongs to the operating system. |
| AltGr combinations on Windows | They must never fire a shortcut; Windows sends AltGr as Ctrl with right Alt. |
A shortcut not behaving as expected on a Mac with a Belgian or French keyboard? That comes down to your keyboard layout. Trikker reads per keystroke which character your layout produces, so the shortcut should sit on the key carrying that character.
18. Troubleshooting
18.1 Common questions
| What you see | Why | What you do |
|---|---|---|
| A symbol will not drag to a free spot on the Wire Schema. | The layout there is fully automatic; free placement does not exist. | Use Move to connect it to another insert point, or the ordering buttons. |
| The whole schema shifts after a small change. | Every change makes Trikker recalculate the entire layout. | Normal behaviour. Order and content are preserved. |
| No insert points appear. | The symbol may not be connected there, or the demo version is at its limit of 5 circuits. | Pick a suitable connection point, switch on Free drawing if needed, or activate your licence. |
| Pasting does not work on the Wire Schema. | There is no paste button there; the copy lives in the library. | Select it in Copied symbols and click an insert point. |
| Circuit letters change after an edit. | The numbering always follows the order of the schema. | Give circuits that must keep their letter a Fixed mark circuit. |
| The EAN code is missing from the print. | The field still holds the example value EAN 54144. | Fill in the real code on the Document tab. |
| A2, A1 and A0 are missing from the paper sizes. | Activate large paper sizes. is switched off. | Tick that option in the settings. |
| Printing does not start and there is no printer choice. | No printer is installed, or you did not give permission to send the dossier. | Install a printer (Microsoft Print to PDF is enough) and check the Privacy tab. |
| New default values do not show up on the schema. | Default values only work forward. | Adjust existing symbols separately, or place them again. |
| All settings are suddenly back at their defaults. | Instellingen.xml was unreadable at startup; Trikker then starts with fresh defaults without a message. | Close Trikker and put a saved copy of that file back. |
| A restored backup is missing the last changes. | Backups run per interval, and only when there were changes. | Set a shorter interval if you like; the minimum is 1 minute. |
| An empty-looking plan page refuses to be deleted. | Invisible placements of since-deleted schema symbols are still on it. | Delete the page through Pages, or open the Bill of materials: rebuilding it clears those leftovers. |
More questions and answers are in the frequently asked questions.
18.2 An unexpected error
If something really goes wrong, Trikker reports An unexpected error occurrred in the program! and writes a text file with the details to your desktop.
Send that file along as an attachment: it holds exactly what we need to fix the error in a next version. Then try to save your document, and start Trikker again.
18.3 The log file
Trikker keeps a running log file. On Windows it lives in %APPDATA%\Bluebits\Trikker\Log\Bluebits.Trikker.Log.txt, on macOS in ~/Library/Application Support/Bluebits/Trikker/Log/Bluebits.Trikker.Log.txt. The timestamps are in UTC, not in your local time.
If the helpdesk asks for that file, it is because the licence check notes every decision in it. The last line starting with SETSTATE > State: says which state Trikker actually ended up in.
18.4 Getting help
- Check for yourself. The frequently asked questions cover the questions we get most often.
- Manage your licence. In the customer portal you see your licences and subscriptions, and you change your address, email address and phone number yourself. Company name and company number we change for you.
- Contact us. Use the contact form or write to info@trikker.be. Mention your Computer ID: and, for an error, the text file from your desktop.
- Remote assistance. With
 Remote Help on the Extra tab you start the program that lets us, with your consent, look at your screen with you.